टॉप 6 तरीके लोअर केस में कैपिटल लेटर्स बदलने के लिए
ऐसे कई तरीके हैं जिनके उपयोग से आप एक्सेल में लोअर केस में कैपिटल लेटर टेक्स्ट को बदल सकते हैं। इस गाइड में, हम विस्तार से निचले मामले में बड़े अक्षरों को बनाने के लिए शीर्ष 6 तरीकों को देखेंगे।
# एक्सेल में केस बदलने के लिए लोअर फंक्शन का उपयोग करना
MS Excel में प्रत्येक वर्ण को एक शब्द में डिकैपिटलाइज़ करने के लिए एक अंतर्निहित फ़ंक्शन होता है, जो एक LOWER फ़ंक्शन है ।
उदाहरण
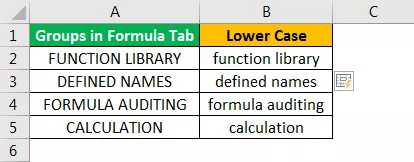
मान लीजिए कि हमारे पास एक्सेल में कुछ क्रियाओं की एक सूची है, हम पाठ के मामले को लोअरकेस में बदलना चाहते हैं।

मामले को कम करने के लिए, हमें सेल C2 में फ़ंक्शन को '= LOWER (A2)' के रूप में लिखना होगा। "= 'या' + 'चिह्न का उपयोग फ़ंक्शन लिखने के लिए किया जाता है, ' LOWER ' फ़ंक्शन नाम है और A2 उस पाठ के लिए सेल संदर्भ है जिसके लिए हम मामले को बदलना चाहते हैं।

एंटर दबाएं, और यह फ़ंक्शन टेक्स्ट स्ट्रिंग में सभी अक्षरों को लोअरकेस में बदल देगा।

एक मान अब परिवर्तित किया गया है। अन्य मानों के लिए, हम या तो शीर्ष सेल वाले सभी कक्षों का चयन करने के बाद Ctrl + D दबा सकते हैं या फ़ंक्शन को कॉपी और पेस्ट करने के लिए Ctrl + C और Ctrl + V दबा सकते हैं। या हम उत्तर पाने के लिए सूत्र को अन्य कोशिकाओं में खींच सकते हैं।

# 2 VBA कमांड बटन का उपयोग करना
हम एक VBA कमांड बटन बना सकते हैं और कमांड बटन का उपयोग करके निम्न पाठ को बदलने के लिए कोड असाइन कर सकते हैं।

उदाहरण
चरण 1: कमांड बटन बनाने के लिए, 'डेवलपर टैब एक्सेल' में 'नियंत्रण' समूह में 'इन्सर्ट' कमांड पर क्लिक करें । और 'कमांड बटन' चुनें ।

चरण 2: उस वर्कशीट के स्थान पर क्लिक करें, जिस पर आप कमांड बटन को दिखाना चाहते हैं। हम ALT बटन का उपयोग करके कमांड बटन का आकार बदल सकते हैं ।

चरण 3: 'गुण' कमांड का उपयोग करते हुए , कमांड बटन के गुणों को बदलें जैसे कैप्शन, नाम, ऑटोसाइज़, वर्डप्रैप, आदि।


चरण 4: अब, कमांड बटन को कोड असाइन करने के लिए, 'डेवलपर' कंट्रोल ' समूह में ' कोड देखें ' कमांड पर क्लिक करें, ' सुनिश्चित करें कि 'डिज़ाइन मोड सक्रिय है।

चरण 5: खुली हुई खिड़की में, ड्रॉप-डाउन सूची से 'ConvertToLowerCase' चुनें ।

चरण 6: पंक्तियों के बीच में निम्न कोड चिपकाएँ।
कोड:
डिम Rng as Range डिम c as रेंज ऑन एरर रिज्यूमे नेक्स्ट सेट Rng = सेलेक्शन में प्रत्येक c के लिए चयन c.Value = LCase (c.Value) नेक्स्ट c

चरण 7: दृश्य मूल संपादक से बाहर निकलें। सुनिश्चित करें कि फ़ाइल को .xlsm एक्सटेंशन के साथ सहेजा गया है क्योंकि हमारे पास हमारी कार्यपुस्तिका में एक मैक्रो है।
चरण 8: 'डिज़ाइन मोड' निष्क्रिय करें । अब, आवश्यक कोशिकाओं का चयन करने के बाद, जब भी हम कमांड बटन पर क्लिक करते हैं, तो मान को लोअरकेस में बदल दिया जाता है।
A2: A10 से सभी मानों का चयन करें और कमांड बटन पर क्लिक करें। टेक्स्ट लोअरकेस में बदल जाएगा।

# 3 VBA शॉर्टकट कुंजी का उपयोग करना
यह तरीका इस तथ्य को छोड़कर उपरोक्त के समान है कि हमें यहां कमांड बटन बनाने की आवश्यकता नहीं है।
उदाहरण
चरण 1: या तो 'डेवलपर' टैब से विजुअल बेसिक एडिटर खोलें या एक्सेल शॉर्टकट कुंजी (Alt + F11) का उपयोग करके ।

चरण 2: सम्मिलित करें मेनू -> मॉड्यूल कमांड का उपयोग करके मॉड्यूल डालें ।

चरण 3: निम्न कोड चिपकाएँ।
Sub LowerCaseConversion() Dim Rng As Range Dim c As Range On Error Resume Next Set Rng = Selection For Each c In Rng c.Value = LCase(c.Value) Next c End Sub

Step 4: Save the file using Ctrl+S. Exit the visual basic editor. Make sure the file is saved with .xlsm extension as we have a macro in our workbook.
Step 5: Now choose the ‘Macros’ in the ‘Code’ group in the ‘Developer’ tab.

Step 6: Then click on ‘Options’ and assign the shortcut key to the Macro, and we can write a description as well.

In our case, we have assigned Ctrl+Shift+L.

Step 7: Macro is ready to use. Now to change the values into lowercase, select the required cells, and press Ctrl+Shift+L.

#4 Using Flash Fill
If we establish a pattern by typing the same value in the lowercase in the adjacent column, the Flash Fill feature will fill in the rest for us based on the pattern we provide. Let us understand this with an example.
Example
Suppose we have the following data, which we want to get in lowercase.

To do the same, we need to write the first value of the list in the lower case manually in the adjacent cell.

Come to the next cell in the same column and just press Ctrl+E.

Choose ‘Accept Suggestions’ from the box menu appeared.

That is it. We have all the values in the lower case now. Now we can copy the values, paste the same onto the original list, and delete the extra value from the right.
#5 Enter Text in Lower Case Only
We can make a restriction so that the user can enter text values in lowercase only.
Example
To do this, the steps are:
- Select the cells which you want to restrict.
- Choose ‘Data Validation’ from the ‘Data Tools’ group from the ‘Data’ tab.
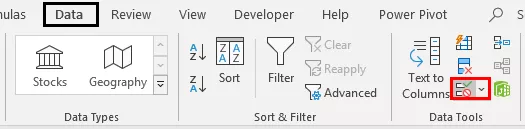
- Apply the settings explained in the figure below.


- Now, whenever the user enters the value in capital letters, MS Excel will stop and will show the following message.

#6 Using Microsoft Word
In Microsoft word, unlike Excel, we have a command named ‘Change Case’ in the ‘Font’ group in the ‘Home’ tab.
Example
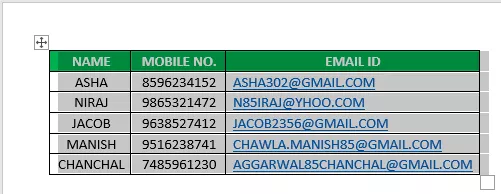
Suppose we have the following table of data for which we want to change the text case to ‘Lower’ Case.

To change the case, first, we will copy the data from MS Excel and paste it into MS Word. To do the same, the steps are:
Select the data from MS Excel. And press Ctrl+C to copy data from MS Excel.

Open the MS Word application and paste the table using the Ctrl+V shortcut key.

Select the table using the ‘Plus’ sign on the left-top side of the table.
Choose the ‘Change Case’ command from the ‘Font’ group and select ‘lowercase’ from the list.

Now, the data table is converted to ‘Lower.’ We can just copy the table after selecting the ‘Plus’ sign from the left top corner and paste it into Excel back.
हम प्रासंगिक मेनू का उपयोग करके पुरानी तालिका को हटा सकते हैं, जिसे हम तालिका पर राइट-क्लिक करके प्राप्त कर सकते हैं।

याद रखने वाली चीज़ें
यदि हम VBA कोड (कमांड बटन या शॉर्टकट कुंजी) का उपयोग करते हैं, तो हम निचले मामले में मूल्यों को परिवर्तित करने के लिए, हमें फ़ाइल को .xlsm एक्सटेंशन के साथ सहेजने की आवश्यकता है क्योंकि हमारे पास कार्यपुस्तिका में मैक्रोज़ हैं।